
DIY House Renovation Guide for Retro Tech Enthusiasts
Retro-inspired renovations are making a stylish comeback in south-african homes, with over 60 percent of homeowners seeking ways to blend nostalgia with smart technology. Many are realizing that a thoughtful design can preserve vintage charm while introducing practical upgrades for modern living. If you are ready to give your space a unique retro flair, this guide outlines how to assess existing features, plan seamless technology upgrades, source authentic accessories, and achieve that perfect retro finish.
Table of Contents
- Stage 1: Assess Existing Features For Retro Potential
- Stage 2: Plan Upgrades Using Vintage-Inspired Tech
- Stage 3: Source Nostalgic Accessories And Finishes
- Stage 4: Execute Renovations With Retro Flair
- Stage 5: Verify Quality And Finish Of All Retro Upgrades
Quick Summary
| Main Insight | Explanation |
|---|---|
| 1. Assess your home’s retro potential | Conduct a visual assessment of architectural features that enhance the retro aesthetic while ensuring structural integrity for planned renovations. |
| 2. Integrate vintage-inspired tech strategically | Create an inventory of spaces and plan for retro tech upgrades that complement your home’s aesthetic using modern functionality wisely. |
| 3. Curate nostalgic accessories carefully | Explore vintage markets and select items that enhance retro appeal, combining authentic pieces with high-quality reproductions for consistency and usability. |
| 4. Execute renovations with a retro focus | Choose period-appropriate materials and energy-efficient solutions that authentically represent your desired retro era without compromising modern comfort. |
| 5. Verify quality and detail of upgrades | Conduct a thorough walkthrough to ensure all retro elements are aligned and functional, documenting details to maintain design authenticity. |
Stage 1: Assess existing features for retro potential
Before diving into your retro tech renovation, you need a systematic strategy to evaluate your current space’s inherent potential. According to Wits University, a methodical approach involves carefully appraising existing structures while preserving historical elements and integrating modern functionalities.
Start by conducting a comprehensive visual assessment of your home’s architectural features. Look for original structural elements that could complement a retro tech aesthetic such as exposed brick walls, wooden flooring, archways, or unique window frames. Pay special attention to rooms with natural character existing areas that naturally lend themselves to vintage styling. As recommended by Private Property, carefully examine the structural integrity of these spaces to ensure they can support your renovation vision.
ProTip: Take detailed photographs and measurements of promising spaces. Create a digital mood board to help visualise how retro tech elements might integrate with your home’s existing architectural character. This preparatory step will save you significant time and resources during the actual renovation process.
With your initial assessment complete, you are now ready to move forward and start imagining the retro tech transformation of your living space.
Stage 2: Plan upgrades using vintage-inspired tech
Planning vintage-inspired technology upgrades requires a strategic approach that balances nostalgic aesthetics with modern functionality. ArXiv research suggests a sophisticated digitalization framework that integrates Internet of Things technologies, cloud computing, and machine learning to facilitate smart maintenance while preserving historical character.
Begin by creating a comprehensive inventory of your existing spaces and identifying specific areas where retro tech can be seamlessly integrated. Look for opportunities to incorporate vintage-styled smart devices that complement your home’s architectural elements. According to ArXiv systematic research, computer vision-based analyses can help you understand how to blend vintage aesthetics with contemporary technological upgrades effectively. Consider elements like smart speakers with classic radio designs, modern televisions with retrofitted wooden cabinets, or smart lighting systems that mimic mid-century lamp aesthetics.
ProTip: Develop a mood board that includes both technological components and design references. This visual planning tool will help you maintain a cohesive retro tech vision and prevent potential design inconsistencies during your renovation journey.
With your initial planning complete, you are now prepared to move forward and start sourcing the perfect vintage-inspired technological elements for your unique space.
Stage 3: Source nostalgic accessories and finishes
Sourcing the perfect nostalgic accessories requires a strategic approach that balances vintage aesthetics with contemporary design sensibilities. Future Finance highlights the current trend of incorporating nostalgic elements in South African home renovations particularly through modern farmhouse and minimalist design styles.
Begin your sourcing journey by exploring specialised vintage markets local antique shops and online platforms dedicated to retro collectibles. Seeff Blog recommends focusing on accessories that enhance your home’s retro appeal while maintaining functional integrity. Look for items like vintage light switches with brass finishes mid century modern furniture pieces ceramic or enamel decorative elements and classic wall art that complement your existing architectural features. Pay attention to materials textures and colour palettes that authentically represent your chosen retro era whether it is 1950s chrome and pastel tones or 1970s earthy browns and oranges.
ProTip: Create a curated collection by mixing authentic vintage pieces with high quality reproduction accessories. This approach allows you to maintain design consistency while ensuring practical usability and avoiding the potential fragility of original vintage items.
With your nostalgic accessories carefully selected you are now ready to transform your space into a beautifully curated retro inspired environment.
Stage 4: Execute renovations with retro flair
Executing your retro tech renovation requires a strategic approach that balances authentic aesthetics with modern functionality. MDPI research highlights innovative passive retrofitting strategies for residential spaces that enhance indoor comfort while preserving the essential character of heritage design.
Begin your renovation by focusing on key architectural elements that can authentically represent your chosen retro era. Technological University Study recommends integrating energy-efficient solutions that maintain your vintage design vision. This might involve carefully selecting period appropriate colour palettes updating electrical systems with vintage style switches and plates and choosing modern appliances with nostalgic design elements. Pay close attention to texture material selection and architectural details that can transform your space from simple renovation to a genuine retro inspired environment.
ProTip: Document your renovation process through photographs and detailed notes. This not only helps track your progress but also creates a valuable record of your unique design journey transforming a contemporary space into a retro tech haven.
With careful execution your renovation will seamlessly blend nostalgic charm with contemporary comfort creating a truly distinctive living space.
Stage 5: Verify quality and finish of all retro upgrades
Verifying the quality and finish of your retro upgrades is a critical final step in your renovation journey. MDPI research emphasises the importance of comprehensive evaluation tools for homeowners undertaking energy and aesthetic retrofits to ensure optimal performance and authenticity.
Conduct a meticulous walkthrough of your renovated space eProp recommends using a systematic approach to assess every detail. Check the alignment of vintage style electrical plates examine the precision of paint finishes test the functionality of retrofitted tech components and ensure colour palettes and textures maintain consistent period authenticity. Look for subtle details like matching metallic finishes ensuring electrical outlets complement your chosen retro aesthetic and verifying that modern technology integrates seamlessly with vintage design elements.
ProTip: Create a detailed photographic documentation of your final renovation highlighting key retro elements. This visual record not only serves as a personal memento but can also provide inspiration for future vintage tech enthusiasts exploring similar design transformations.
With your quality verification complete you have successfully transformed your space into a stunning retro tech sanctuary blending nostalgia with contemporary functionality.
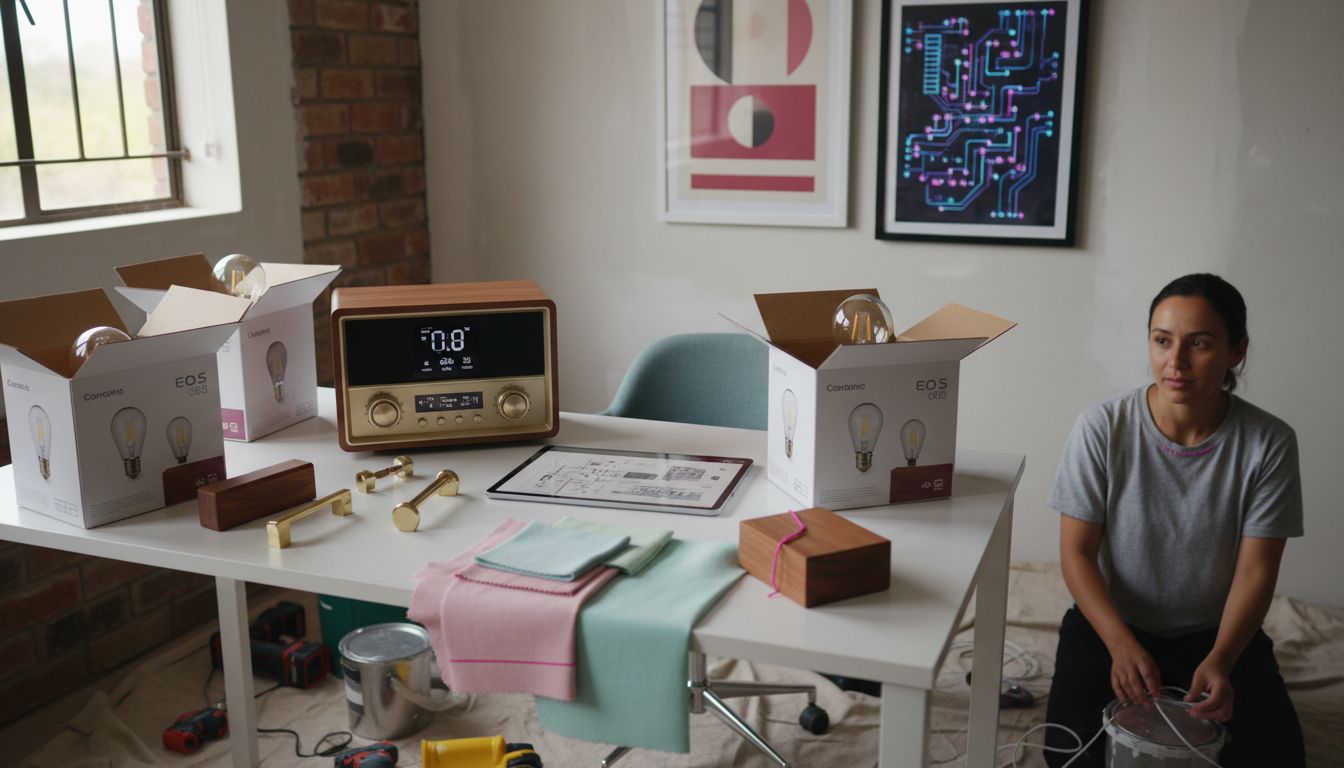
Elevate Your Retro Tech Renovation with OnlyRetro
Transforming your home into a retro tech sanctuary involves careful planning and sourcing of vintage-inspired technology and accessories. The challenge is to blend nostalgic charm with modern functionality while maintaining authentic aesthetics and superior quality as highlighted in the DIY guide. You want to find smart tech gadgets and unique finishes that capture the retro feel without compromising on convenience or performance.
![]()
OnlyRetro specialises in providing a curated collection of vintage-style tech products and nostalgic accessories designed to bring your renovation vision to life. Whether you need smart devices with classic designs, retro-styled audio gadgets, or unique home decor pieces to complete your space, you will find exactly what you need at OnlyRetro. Make your retro tech upgrades seamless and stylish by exploring our full range of vintage-inspired technology products and gear up for a stunning transformation today. Start your journey now and give your DIY retro renovation the perfect finish with authentic pieces from OnlyRetro.
Frequently Asked Questions
How do I assess my home’s existing architectural features for retro tech potential?
Begin by conducting a thorough visual assessment of your home’s architectural style. Look for original elements like exposed brick or unique window frames that can enhance a retro aesthetic. Capture detailed photographs and measurements to create a digital mood board for your design.
What steps should I take to plan upgrades with vintage-inspired technology?
Start by creating an inventory of your current spaces and identifying where retro tech can fit in. Consider incorporating vintage-styled smart devices that complement your home’s character. Make a mood board combining technological elements and design references to keep your vision cohesive.
What types of nostalgic accessories should I look for during my renovation?
Focus on collecting vintage items that enhance your home’s retro appeal while remaining functional. Seek accessories such as mid-century modern furniture, vintage light switches, or wall art that reflect your chosen retro era. Mixing authentic pieces with high-quality reproductions will help maintain design consistency.
How can I ensure the execution of my renovation maintains retro flair?
Pay special attention to key architectural details that authentically represent your chosen retro style. Select colour palettes and materials that align with vintage design, and choose modern appliances that blend seamlessly with the overall aesthetic. Document your renovation process with photographs to track your progress and preserve your unique design journey.
What should I check to verify quality and finish of my retro upgrades?
Conduct a thorough walkthrough of your renovated space to examine details like the alignment of electrical plates and the finish of paint. Make sure that all elements, from colour palettes to textures, maintain the consistent period authenticity expected in retro style. Create photographic documentation to highlight key elements and to serve as inspiration for others.