
How to Care for Vinyl Records: Preserve Your Collection
Vinyl records are more than just music, they are nostalgia pressed into black grooves. Here is something most collectors never realize. Even slight changes in temperature or humidity can shrink the lifespan of your prized records by years. Dust and sunlight are not the only threats, because the way you prepare, clean, and store your albums has a much bigger impact than you think.
Table of Contents
- Step 1: Prepare Your Vinyl Care Environment
- Step 2: Clean Your Records Properly
- Step 3: Store Your Vinyl Records Safely
- Step 4: Inspect Your Records Regularly
- Step 5: Maintain Your Turntable For Optimal Sound
Quick Summary
| Key Point | Explanation |
|---|---|
| 1. Create a controlled environment | Ensure your workspace is clean, stable in temperature, and free from sunlight to protect your vinyl records from damage. |
| 2. Clean records properly before play | Use a carbon fiber brush and specialized cleaning solutions regularly to maintain sound quality and extend the life of your vinyl. |
| 3. Store records vertically and safely | Always store vinyl upright in acid-free sleeves to prevent warping, physical damage, and dust accumulation on the records. |
| 4. Inspect records regularly for damage | Conduct monthly inspections to identify issues like scratches or warping promptly, ensuring optimal playback quality and preservation. |
| 5. Maintain your turntable for best sound | Regularly clean and calibrate your turntable, particularly the stylus, to ensure it reproduces sound accurately without damaging records. |
Step 1: Prepare Your Vinyl Care Environment
Preserving your vinyl records begins long before you touch an album, and creating the right environment is crucial to maintaining their pristine condition. The care process starts with understanding that vinyl is a delicate medium susceptible to environmental factors that can cause irreversible damage.
Creating a Controlled Handling Space
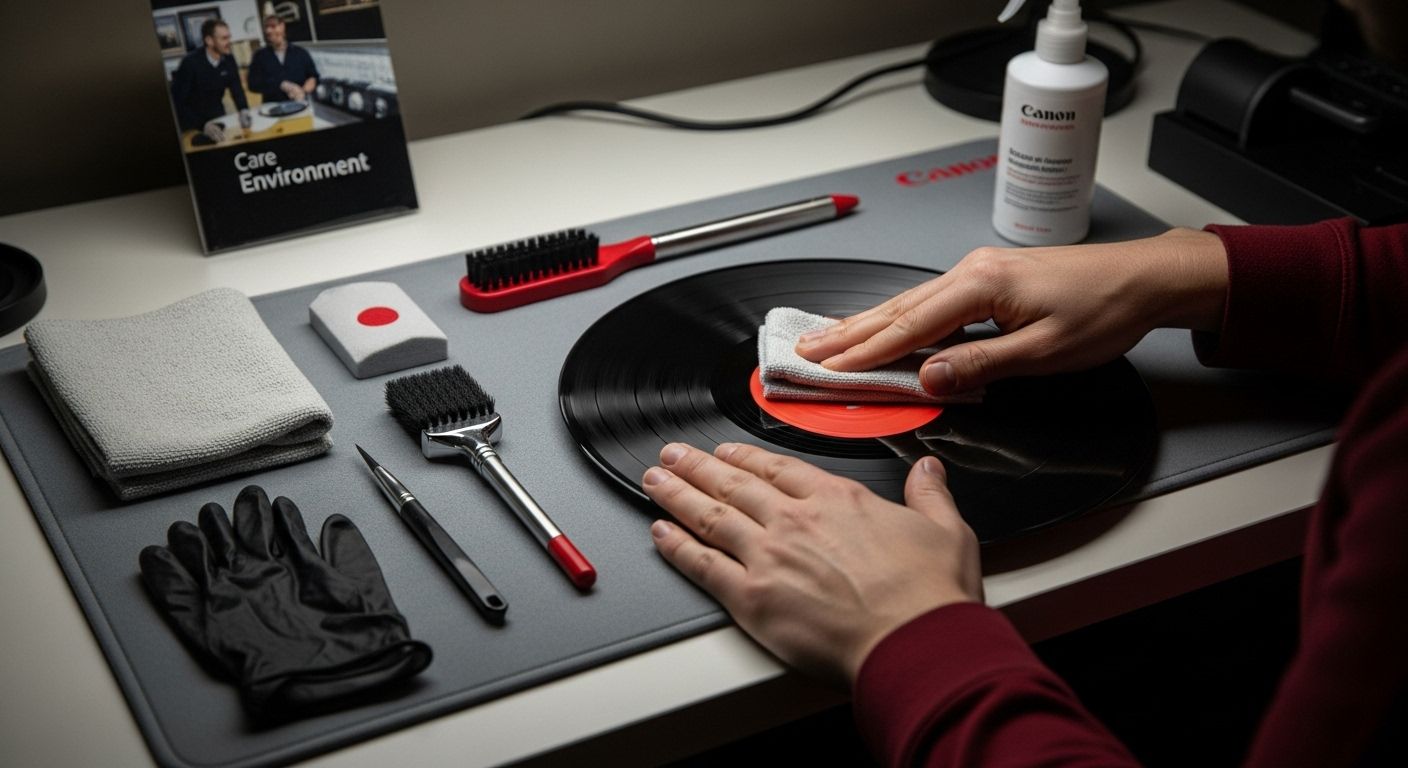
Your vinyl care routine requires a dedicated, clean workspace that minimizes potential risks. Select an area away from direct sunlight, high humidity, and temperature fluctuations. A stable environment with consistent room temperature around 65-70 degrees Fahrenheit prevents warping and material stress. According to Smithsonian Magazine, museum preservation experts recommend preparing surfaces that are smooth, clean, and free from abrasive materials.
Prepare your workspace with specific tools to support careful record handling. Essential items include:
- Soft, lint-free microfiber cloths
- Record cleaning brush
- Cotton gloves (optional but recommended)
- Clean, flat surface covered with a soft mat
Before handling any records, wash and dry your hands thoroughly. Oils, dirt, and residue from skin can permanently damage vinyl surfaces. Consider wearing cotton gloves as an extra protective measure, which prevents direct skin contact and transfers of natural skin oils.
Below is a summary table of the essential tools and materials recommended for each step of vinyl care. This will help you gather everything you need for proper cleaning, inspection, storage, and maintenance.
| Step | Tool/Material | Recommended Use |
|---|---|---|
| Preparing Environment | Lint-free microfiber cloths | Clean workspace & handling surfaces |
| Record cleaning brush | Remove surface dust | |
| Cotton gloves (optional) | Prevent skin oil transfer | |
| Soft mat | Protects record during handling | |
| Cleaning Records | Carbon fiber record brush | Remove loose dust before/after play |
| Microfiber cloths | Apply/dry cleaning solution | |
| Specialized cleaning solution | Deep groove cleaning | |
| Distilled water | Dilution/cleaning | |
| Soft-bristled cleaning brush | Deep cleaning solution application | |
| Storing Safely | Archival-quality inner sleeves | Protect from dust/static |
| Protective outer sleeves (acid-free) | Shield covers from dust/moisture | |
| Storage dividers/containers | Organize and support upright records | |
| Inspecting Records | Magnifying glass | Detect micro-damage |
| Maintaining Turntable | Stylus cleaning brush/solution | Clean stylus for playback |
| Stylus tracking force gauge | Calibrate turntable pressure | |
| Anti-static brush | Reduce static & remove dust |
Understanding Potential Environmental Hazards
Vinyl records are remarkably sensitive to their surrounding environment. Dust, temperature changes, direct sunlight, and improper storage can cause microscopic damage that accumulates over time. Avoid storing records in areas prone to extreme temperature shifts like near heating vents, air conditioners, or windows. Sunlight can cause warping and fade album artwork, while humidity can promote mold growth.
By meticulously preparing your vinyl care environment, you set the foundation for long-term record preservation. Each careful step you take protects not just the physical record, but the musical memories embedded within its grooves. The next stages of vinyl care will build upon this critical preparation, ensuring your collection remains a treasured source of musical enjoyment for years to come.
Step 2: Clean Your Records Properly
Cleaning vinyl records is a delicate art that requires precision, patience, and the right techniques. Dust, dirt, and microscopic debris can permanently damage your record’s sound quality, making proper cleaning an essential aspect of vinyl preservation. Treating your records with care during the cleaning process will help maintain their audio fidelity and extend their lifespan.
Essential Cleaning Tools and Techniques
Before beginning the cleaning process, gather the necessary tools. According to the Library of Congress, using specialized equipment is crucial for protecting your vinyl collection. A high-quality carbon fiber record brush, microfiber cloths, and a dedicated record cleaning solution will be your primary allies in maintaining pristine records.
Begin by removing loose surface dust using a carbon fiber brush. Hold the brush at a slight angle and gently sweep across the record’s surface in the direction of the grooves. Never brush against the groove pattern, as this can push debris deeper into the record’s delicate surface. Perform this gentle brushing before and after each play to minimize dust accumulation.
Deep Cleaning Approach
For more thorough cleaning, invest in a professional-grade record cleaning solution. Essential items for a comprehensive cleaning include:
- Distilled water
- Specialized vinyl cleaning solution
- Soft, lint-free microfiber cloths
- Soft-bristled cleaning brush
- Clean, lint-free drying cloth
Apply the cleaning solution sparingly and methodically. Spray the solution onto a microfiber cloth rather than directly onto the record to prevent liquid from seeping into the label or record edges. Gently wipe in a circular motion following the groove pattern, using light pressure to remove stubborn grime. Always use a clean section of the cloth to prevent redepositing dirt.
After cleaning, allow the record to air dry completely in a dust-free environment. Never use heat sources like hairdryers, as they can warp the vinyl. Once dry, store the record in a clean, anti-static inner sleeve to prevent immediate dust reaccumulation.
Remember that cleaning is not a one-time event but a regular maintenance ritual. Develop a consistent cleaning routine that becomes second nature, treating each record with the respect it deserves. By investing time in proper cleaning techniques, you’ll preserve the rich, warm sound of your vinyl collection and ensure these musical treasures continue to bring joy for years to come.
Step 3: Store Your Vinyl Records Safely
Proper storage is the cornerstone of vinyl record preservation, transforming your collection from a simple group of albums into a carefully maintained musical archive. The way you store your records directly impacts their longevity, sound quality, and overall condition. Protecting these delicate musical artifacts requires more than just finding a convenient shelf space.
Creating the Ideal Storage Environment
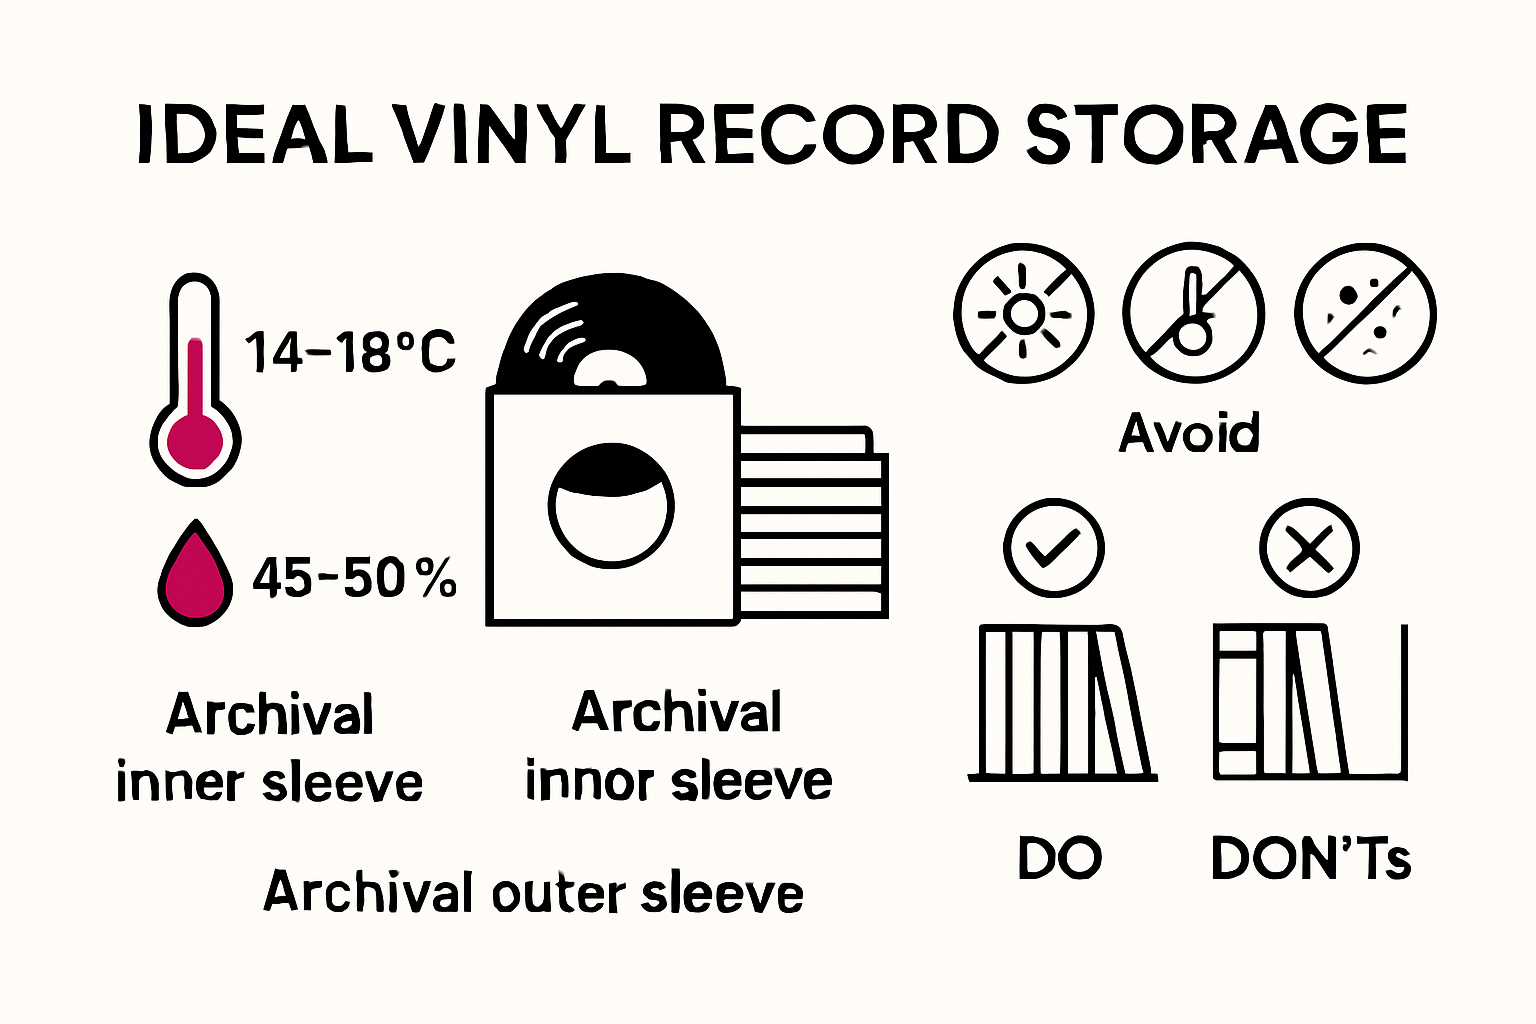
According to the Library of Congress, vinyl records demand a specific storage approach that goes beyond casual placement. Temperature and humidity are critical factors in record preservation. Aim to maintain a consistent environment around 65-70 degrees Fahrenheit with moderate humidity levels. Avoid areas with dramatic temperature fluctuations like near windows, heating vents, or air conditioning units.
Choose storage furniture specifically designed for vinyl records. Vertical storage is non-negotiable. Records must always stand upright, never stacked horizontally or leaned at an angle. This prevents warping and reduces stress on the vinyl’s structure. Invest in sturdy record shelves or cabinets that support the full height of the album without allowing it to lean or bend.
Essential storage accessories include:
- Archival-quality inner sleeves
- Protective outer sleeves
- Anti-static record dividers
- Acid-free storage containers
Advanced Protection Strategies
Beyond basic positioning, advanced record protection involves creating a comprehensive preservation system. Replace standard paper sleeves with anti-static, archival-quality inner sleeves that prevent dust accumulation and reduce static electricity. These specialized sleeves minimize friction and protect the record’s delicate grooves during insertion and removal.
Outer protective sleeves add an additional layer of defense against environmental contaminants. Choose clear, acid-free outer sleeves that shield your album covers from dust, moisture, and potential physical damage. Handle these protective layers with clean hands, and replace them if they become worn or damaged.
Consider the location of your record storage carefully. Keep your collection away from direct sunlight, which can fade album artwork and potentially warp vinyl. Maintain a dedicated storage area that remains consistently cool, dry, and free from dust. Avoid basement or attic storage, where temperature and humidity fluctuate dramatically.
By implementing these meticulous storage techniques, you transform record preservation from a casual practice into a deliberate art form. Each carefully placed record becomes a protected piece of musical history, ensuring that the rich, warm sounds captured in those grooves remain pristine for years to come.
Step 4: Inspect Your Records Regularly
Regular inspection is the silent guardian of your vinyl collection, a critical maintenance ritual that prevents minor issues from becoming catastrophic damage. Think of record inspection like a medical checkup for your musical treasures - early detection can save an entire album from potential destruction.
Visual and Tactile Examination Techniques
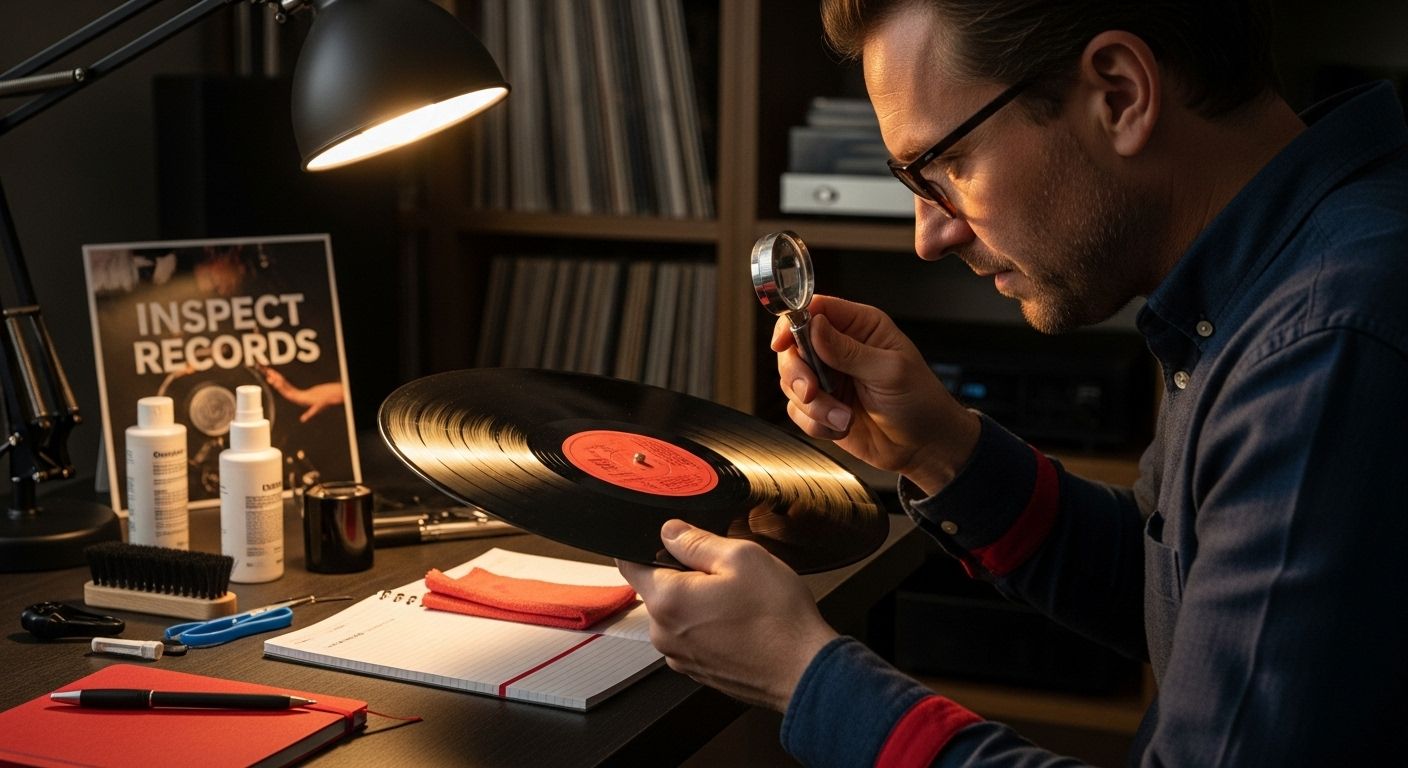
Begin your inspection under bright, indirect lighting that allows you to see minute details without harsh shadows. Hold each record at eye level, rotating it slowly to catch any potential surface irregularities. Look for specific warning signs that indicate potential damage or wear: hairline scratches, dust accumulation in groove valleys, warping, or discoloration.
A magnifying glass can be an invaluable tool during these examinations. It allows you to detect microscopic damages that might escape casual observation. Focus on identifying different types of surface imperfections:
- Superficial dust and debris
- Hairline surface scratches
- Deep groove damage
- Potential warping or material stress
- Discoloration or material degradation
Systematic Inspection Process
Develop a consistent inspection routine that becomes second nature. Set aside dedicated time each month to thoroughly examine your entire collection. Start by removing records from their sleeves carefully, holding them only by the edges to prevent additional contamination. Inspect both the record surface and the sleeve itself, as damaged packaging can introduce environmental risks.
Pay special attention to records that are played frequently. These albums experience more mechanical stress and are more likely to develop wear patterns. Listen carefully during playback for any unusual sounds like crackling, popping, or inconsistent audio that might indicate surface damage not visible during visual inspection.
Here is a checklist table to help you with a systematic inspection process for your vinyl records, covering both visual and listening checks. Use this table each month to keep your collection in top shape.
| Inspection Step | What to Do | What to Look For |
|---|---|---|
| Visual Check | Examine under bright, indirect light | Dust, scratches, warping, staining |
| Rotate Record | Hold at eye level, rotate slowly | Surface irregularities |
| Use Magnifying Glass | Inspect grooves and surface closely | Micro-scratches, groove damage |
| Check with Playback | Listen to record | Crackling, pops, inconsistent audio |
| Inspect Sleeves | Look at inner/outer sleeves | Tears, dirt, mold, damage |
| Document Findings | Make notes in notebook or spreadsheet | Observed issues, actions taken |
| Repeat for Each Record | Perform steps monthly | Up-to-date collection health |
Documenting your findings can help track your collection’s condition over time. Consider creating a simple spreadsheet or notebook where you record inspection dates, observations, and any maintenance performed. This systematic approach transforms record care from a reactive process to a proactive preservation strategy.
Remember that prevention is always more effective than repair. By implementing regular, thorough inspections, you’re not just maintaining records - you’re preserving musical memories. Each careful examination is an investment in the longevity of your vinyl collection, ensuring that the rich, warm sounds captured in those grooves continue to resonate for years to come.
Step 5: Maintain Your Turntable for Optimal Sound
A well-maintained turntable is the unsung hero of exceptional vinyl playback. Your record player is not just a device but a precision instrument that requires regular care to ensure the highest quality sound reproduction and protection of your cherished vinyl collection. Understanding and implementing proper turntable maintenance transforms listening from a simple audio experience to an audiophile’s delicate art.
Essential Turntable Maintenance Fundamentals
According to the Library of Congress, maintaining your turntable involves multiple critical considerations. The stylus, or needle, is the most crucial component requiring consistent attention. This tiny yet complex piece directly interfaces with your record’s delicate grooves, making its condition paramount to sound quality and record preservation.
Begin by examining the stylus under bright, indirect light. Look for visible signs of wear, such as rounded tips, accumulated dust, or slight bending. A compromised stylus can cause irreparable damage to your records, so replace it according to manufacturer recommendations or after approximately 1000 hours of playtime.
Essential turntable maintenance tools include:
- Stylus cleaning brush
- Precision stylus cleaner solution
- Soft, lint-free microfiber cloths
- Stylus tracking force gauge
- Anti-static brush
Calibration and Precision Techniques
Proper turntable calibration goes beyond visual inspection. Tracking force - the downward pressure of the stylus on the record - must be precisely adjusted. Too little force causes skipping, while excessive pressure can damage record grooves. Use a specialized tracking force gauge to ensure the stylus applies exactly the manufacturer’s recommended weight.
Pay close attention to the turntable’s physical environment. Place your record player on a stable, level surface away from vibrations. Avoid positioning near speakers or areas with significant foot traffic, as external vibrations can compromise sound quality and potentially damage the delicate tracking mechanism.
Regular cleaning is non-negotiable. Gently clean the turntable’s surface with a microfiber cloth, removing dust and preventing potential static buildup. Use an anti-static brush on the stylus before and after each play, sweeping in a single direction to remove accumulated debris without causing additional wear.
By treating your turntable as a precision instrument requiring consistent, thoughtful maintenance, you’ll ensure that every vinyl record sounds as close to its original recording as possible. Your commitment to turntable care directly translates to preserving the rich, warm sound that makes vinyl such a beloved musical medium.
Take Your Vinyl Preservation to the Next Level with OnlyRetro
You have invested time and care in protecting your vinyl records, creating the perfect environment, cleaning each album with precision, and committing to proper storage and regular inspection. Still, finding the right accessories and reliable tech to support your passion can feel like a challenge. A common struggle for collectors in South Africa is sourcing retro technology and unique audio gadgets that both protect and showcase their prized collections. OnlyRetro understands these pain points and makes it easy to equip your vinyl space with quality tech and nostalgic flair.
Ready to upgrade your listening experience or safeguard your collection with stylish, durable gear? Browse OnlyRetro for a curated selection of vintage-inspired audio gadgets and protective accessories that perfectly complement your commitment to record care. Don’t let outdated or hard-to-find equipment put your vinyl at risk. Visit our store today and discover exclusive products that turn your preservation knowledge into a complete at-home retro setup. Secure your collection and enjoy every note the way it was meant to sound. Shop now for solutions that bring your vinyl care journey full circle.
Frequently Asked Questions
How should I clean my vinyl records?
To clean your vinyl records, use a carbon fiber brush to remove loose dust, brushing along the groove direction. For deep cleaning, apply a specialized vinyl cleaning solution on a microfiber cloth and gently wipe in a circular motion following the grooves. Allow the record to air dry completely before storing it in a dust-free inner sleeve.
What is the ideal storage environment for vinyl records?
The ideal storage environment for vinyl records is a consistent temperature of approximately 65-70 degrees Fahrenheit with moderate humidity levels. Store your records vertically in dedicated shelves, away from direct sunlight and areas with temperature fluctuations, to prevent warping and damage.
How often should I inspect my vinyl records?
You should inspect your vinyl records on a regular basis, ideally once a month. Look for visible signs of dust, scratches, or warping, and make note of any records that show signs of wear for more thorough cleaning or care.
What maintenance does my turntable require for optimal sound?
To maintain your turntable for optimal sound, regularly clean the stylus with a stylus cleaning brush and check for wear. Adjust the tracking force accurately, keep the turntable on a stable surface to avoid vibrations, and clean the surface of the turntable to prevent dust accumulation.
Recommended
- Retro Crazy Horse Texture Leather Phone Case, Compatible with Xiaomi R – OnlyRetro
- Retro Texture Leather Watch Band, Compatible with Apple Watch 6 40mm – OnlyRetro
- Retro Crazy Horse Texture Horizontal Flip Leather Case compatible with – OnlyRetro
- Milanese Metal Magnetic Watch Band, Compatible with Apple Watch SE 202 – OnlyRetro